Every year, Mopars at the Strip holds a charity raffle for a freshly restored giveaway car, with all the proceeds going to charity. The plan was to show people that our new Hotchkis suspension system for classic Mopars is so easy to install, you can do it anywhere with hand tools. Steve’s idea was to find an affordable vintage B-Body, then do a “live build” at the show where he’d install our suspension, plus big brakes, cool wheels and tires and a few other mods.
By the end of the weekend the car would be transformed into a cool canyon burner, and over the next year Phil and Steve would do some cosmetic massaging as well. Finally, the Coronet would be the raffle giveaway car at the 2010 event with proceeds going to the Lili Claire Foundation, the Southern Nevada Fire Fighters Burn Foundation and Speedway Children’s Charities.
Phil loved the idea and quickly tracked down a very clean but mostly original 1966 Dodge Coronet 440 4-Speed. Wilwood Brakes stepped up with a complete four-wheel disc brake system, Bonspeed Wheels offered up a set of beautiful billet 18-inch wheels, and Pirelli supported the project with high-performance rubber.
DAY ONE
Once the parts arrived, we dragged the Dodge to Vegas, set it up in a tent adjacent to the Hotchkis display, and started work Friday around noon. By the end of the day the old suspension was gone. Steve spent the entire day Saturday working with Hotchkis Chief Engineer Aaron Ogawa and Chief Mechanic Corey Bedortha rebuilding the big Mopar. First new Hotchkis Sport Springs were installed in back, then new high-performance Hotchkis shock absorbers. The drum brakes were removed from the factory 8-3/4” rear differential, which was then fitted with Wilwood 11” rear disc brakes clamped by four-piston calipers. Finally a Hotchkis adjustable rear sway bar was bolted in for maximum balance, traction and control.
DAY TWO
Up front, when we stripped the suspension down we realized that somewhere along the line the car’s stock drum brakes and spindles were swapped out for a late ‘70s Dart disc brake setup, complete with a Dart spindle. Since our killer new Wilwood disc brake system was ordered for a Coronet spindle Steve called in the Mopar favor squad, and some local friends showed up and traded us straight across for a correct set of spindles.
Then Steve went about installing a new late model master cylinder, while Aaron and Corey installed new Hotchkis adjustable strut rods, a new Hotchkis Geometry Corrected Tubular Upper A-Arm, Hotchkis Adjustable Steering Rod and the factory torsion bar. Everything bolted on quickly and easily without a hiccup. We bolted Wilwood’s trick CNC-machined caliper braket to the back of the spindle, which is bolted in after our Hotchkis HPS shocks. Then the gorgeous milled aluminum Wilwood hub was bolted to the 12.3” vented disc brake rotor and safety wired per the instructions. The new rotor/hub slipped right on, and massive six-piston calipers were clamped on for maximum performance. The final suspension step was the addition of a Hotchkis Sport Sway bar.
DAY THREE
With the suspension and brakes dialed-in, we bolted on the beautiful Bonspeed “RODR” 18-inch billet wheels, which featured dark grey painted center spokes and a polished soft lip rim. Tires were Pirelli PZero on all four corners for maximum traction.
As we lowered the car off the jack stands, the crowd that had been milling around the booth all weekend doubled in size. Once the Coronet hit the asphalt and settled onto its new haunches, a collective gasp rushed through the audience. Despite the fact that we didn’t touch the paint or any other cosmetics, it looked like a completely different car. Hunkered-down with a perfect stance, the big Dodge had become a bonafide G-Machine, and now it drives like a modern muscle car. The local Channel 8 News even stopped by to film the final stage of construction!
We left the Coronet in Las Vegas so Phil and the Painter Dodge crew can do some minor restoration and cosmetic touches under Steve’s advisement. Steve is also planning on travelling back to Vegas to sort out the final details before the car goes up for raffle next year. We couldn’t be happier with the way our first Mopar Live Build turned out. The audience at Mopars at the Strip was receptive, inquisitive and extremely friendly, the car looks and drives like a totally new machine, and best of all the proceeds from the build will help support a variety of excellent charities.
CONCLUSION
The goal of the project was to show the Mopar community that you can build a FUN, FAST and AFFORDABLE Chrysler muscle car at home with hand tools on a budget. If someone were to replicate the build, it would cost less than $20k, including the price of the big block four-speed B-Body. The result is a fast, fun-to-drive muscle car that stands out from the crowd.
Most importantly, our new system utilizes the stock K-Member and Spindle, applying modern geometry and heavy duty hardware for superior handling while preserving the all-Chrysler soul of your Mopar. Special thanks to Steve Strope ofPure Vision, Wilwood Brakes, Bonspeed Wheels and Pirelli Tires. For more information on how to win the car at the 2010 Mopars at the Strip, go to www.MoparsattheStrip.com
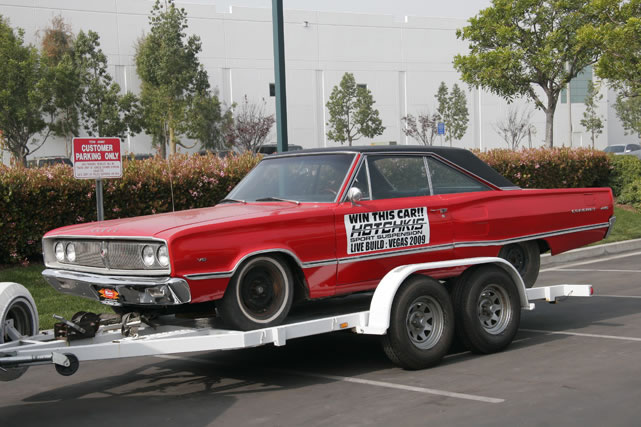 Phil Painter acquired the nearly-stock 4-speed Coronet in Phoenix, and all the original owner wanted to keep from the car was the Cragar SS wheels – hence the old steelies with bias-ply tires it was rolling on when we towed it out to Las Vegas. |
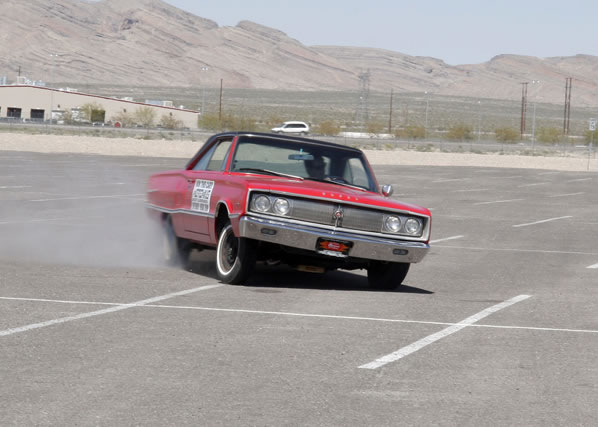 Car Builder, Designer and Stunt Driver Steve Strope not only coordinated the Live Build project, he also did the “before” driving on a makeshift slalom course in the Las Vegas Motor Speedway parking lot adjacent to Mopars at the Strip. As you can see, the stock suspension has some body roll issues. |
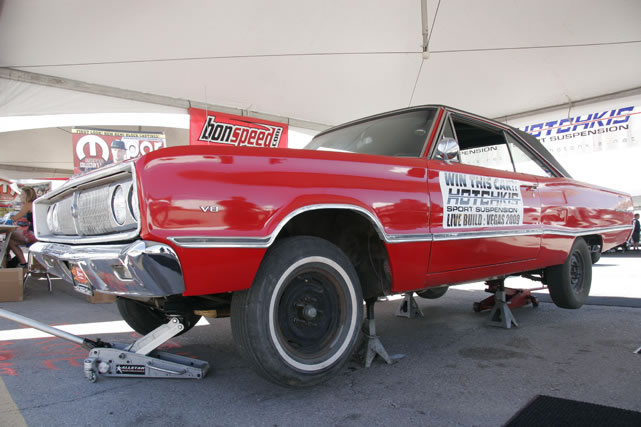 Once we proved that the big B-Body’s original suspension was less than ideal for carving chicanes, we backed it into the Hotckis Live Build tent and went to work. No lifts here – just four jackstands and hand tools. |
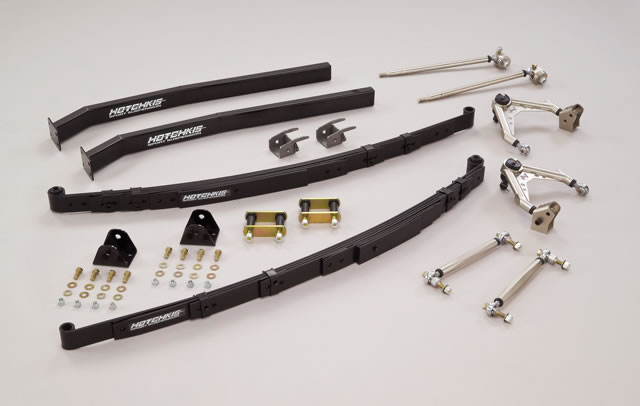 The primary goal of the build is to make the Coronet handle and drive like a modern muscle car. To accomplish this, we used a Hotchkis B-Body Total Vehicle System (TVS), which includes (clockwise from right) Geometry Corrected Tubular Upper A-Arms, adjustable tie rods, sport leaf springs, subframe connectors, adjustable strut rods and front and rear sway bars (not pictured). |
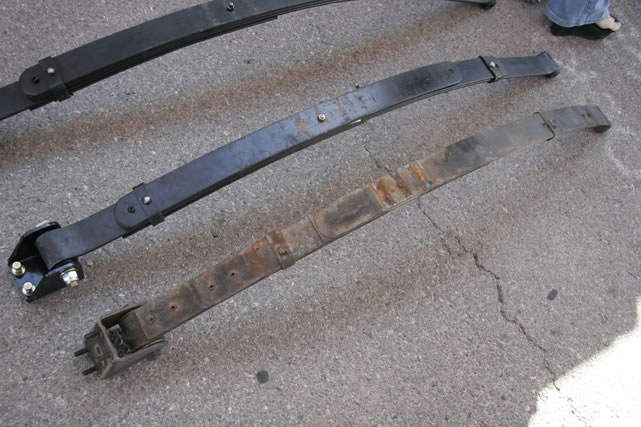 Here you can see the stock rear leaf compared to a Hotchkis Sport Spring. Unlike Mopar Performance springs that are extremely heavy duty and feature different rates for left and right to compensate for drag racing, our springs use fewer stronger leafs with higher spring rebound rates. The result is a lower ride height, superior handling and excellent traction. |
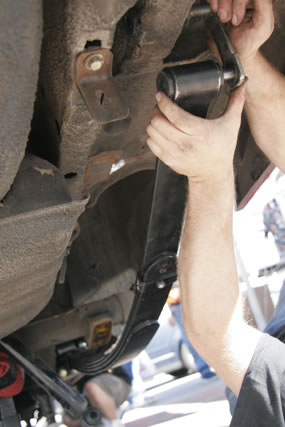 Hotchkis Chief Mechanic Corey Bedortha installed the new Sport Spring on its included perch by greasing the bushing and sliding it into place. |
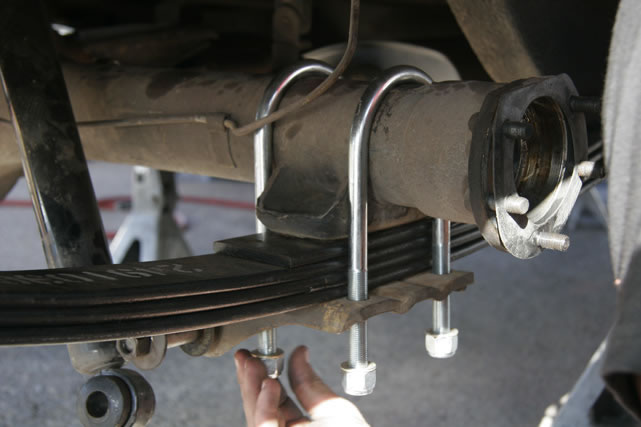 The rear differential is bolted back onto the spring by guiding the pad onto the locater bracket, then evenly tightening the U-Bolts on both sides. Next the shocks were replaced with new Hotchkis HPS sport shocks. |
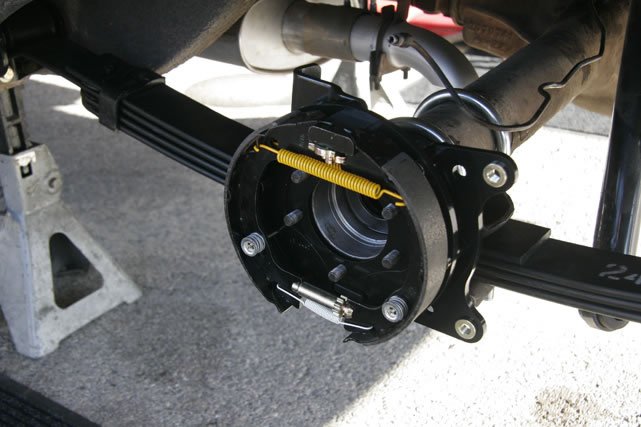 While the axle was still out of the rear differential housing, we installed a new Wilwood caliper mounting brackets with integrated parking brake onto each side. Like most Wilwood products, these brackets were CNC milled and powdercoated aluminum, and bolted up quickly and easily. |
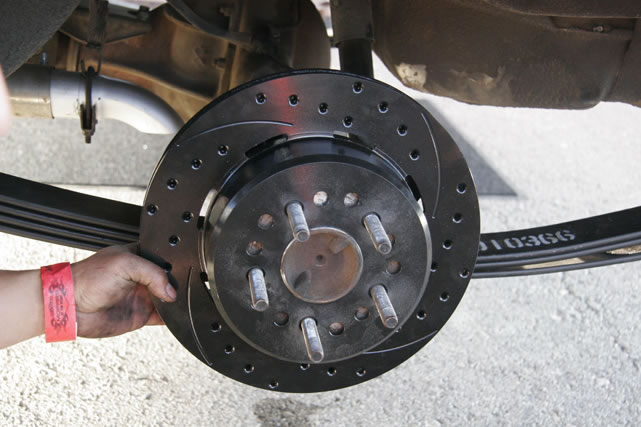 Next we slid the axles back in place and tested the rear disc rotor. Since the parking brake is essentially a mini drum brake within the hub of the rotor, it’s necessary to adjust it so it doesn’t drag and the rotor spins freely. |
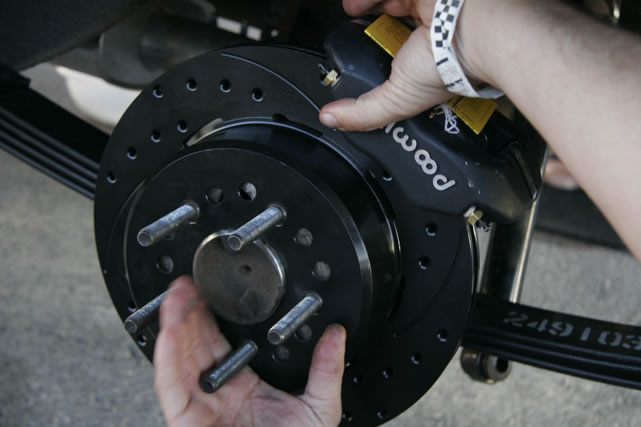 With the brake adjusted, we bolted on the Wilwood aluminum four-piston rear caliper. This is a really slick looking piece that will make a dramatic difference in stopping distance. |
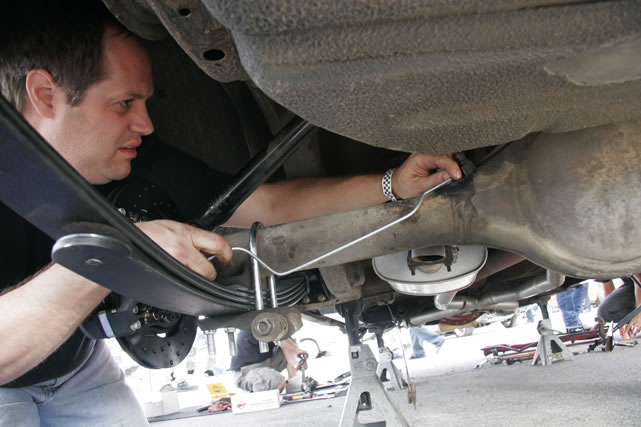 Steve then started measuring and fabricating rear brake lines to connect the new calipers to the brake line distribution block on top of the rear end. |
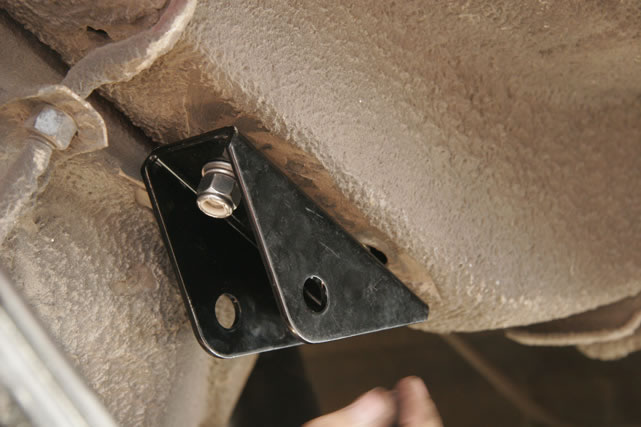 Finally it was time to install the rear sway bar.The Hotchkis rear sport sway bar mounts to the subframe with the bracket above, which uses one existing hole for proper location and requires you to drill a second hole. |
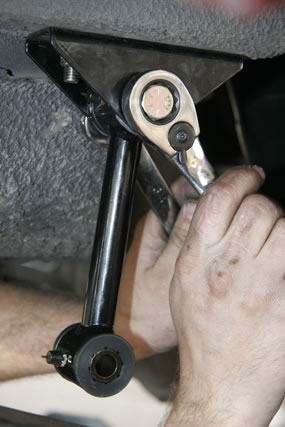 Once the bracket is snugly secured to the car bolt the sway bar end link in place. This allows articulation during hard cornering but keeps body motion under control. |
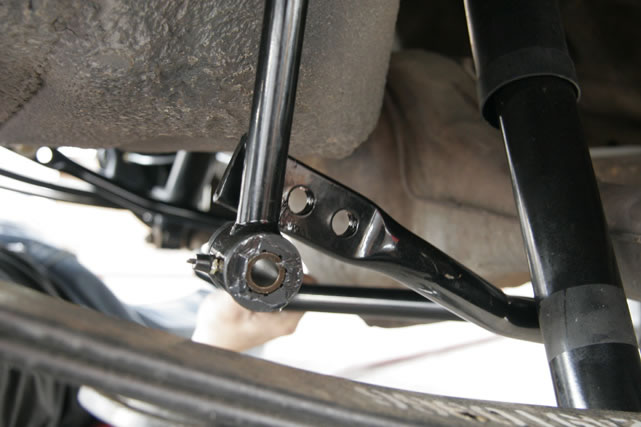 The Hotchkis Sport Sway Bar is adjustable, allowing the driver to dial-in understeer and oversteer into the car’s handling setup. We started with the middle hole. |
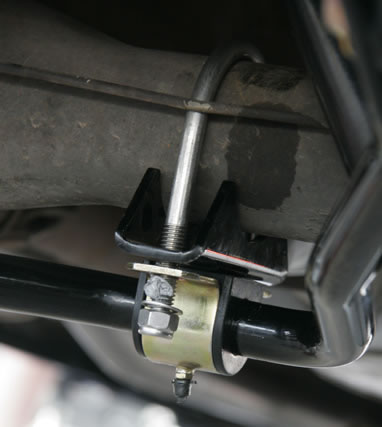 The bar attaches to the rear end with brackets and U-bolts. Notice the anti-seize on the threads to prevent binding. |
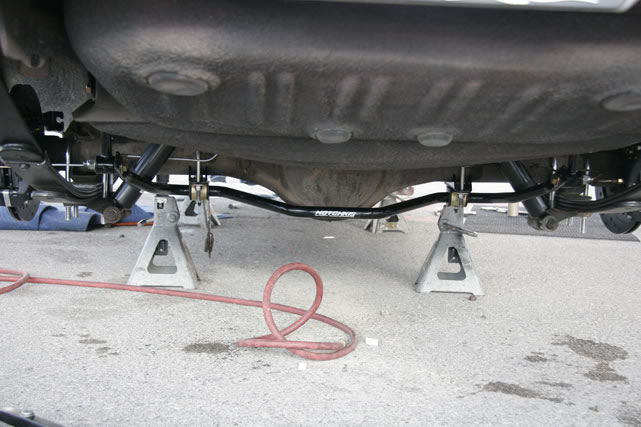 Steve, Aaron and Corey had the rear suspension and brakes finished before lunch on Saturday.. |
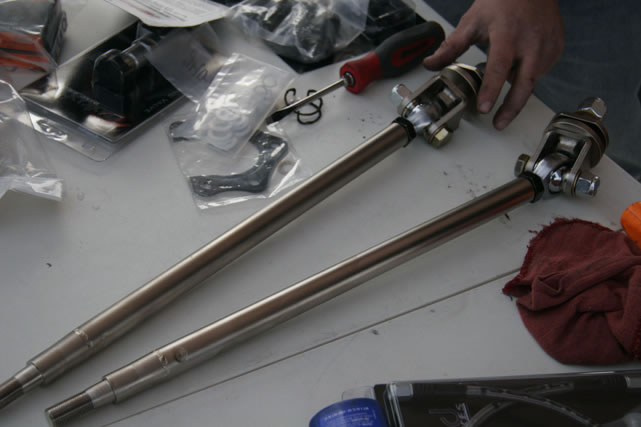 Once we got the front end stripped down, the spindle removed and only the lower control arm remained, it was time to start bolting on parts, like these new Adjustable Strut Rods. |
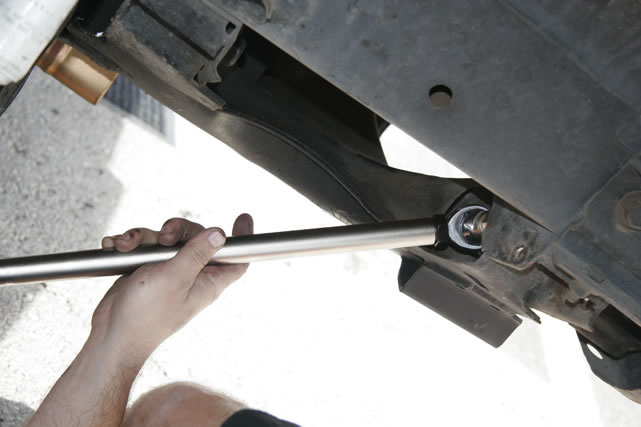 Hotchkis Adjustable Strut Rods positively position the lower arm to improve responsiveness, and they use a high-articulation 5/8” aircraft-style rod end for smooth range of motion. |
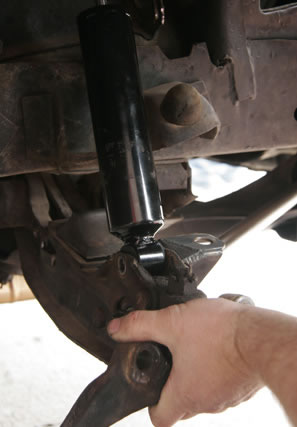 Next we raised the lower A-arm back into place and attached it to a new Hotchkis HPS sport shock absorber. |
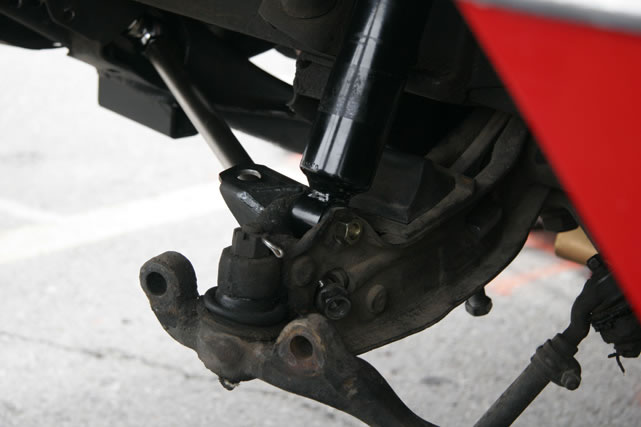 Here you can see the new strut rod and shock in place, as well as the original steering tie rod which will be gone shortly. |
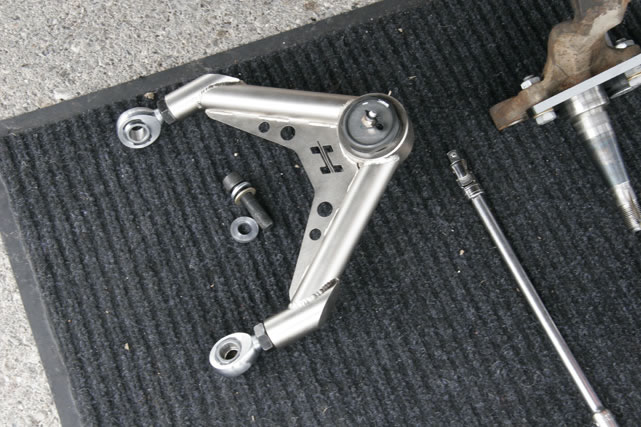 Our engineers spent hundreds of hours developing a new Upper A-arm that corrects the excessive caster gain found in the factory setup, reduces bump steer and improves handling. |
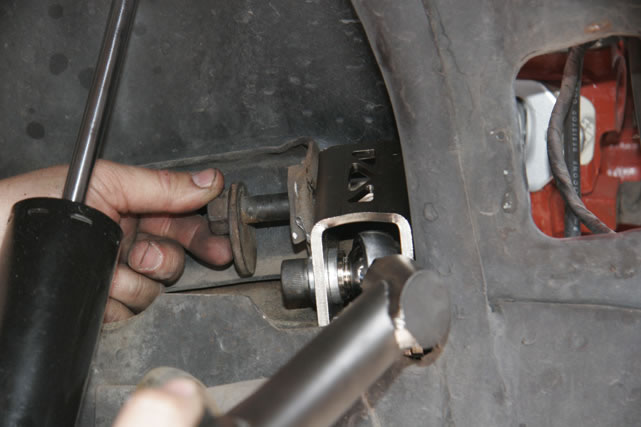 This laser-cut bolt-in relocation bracket relocates the arm further out, eliminating caster gain and allowing for increased adjustability during alignment. |
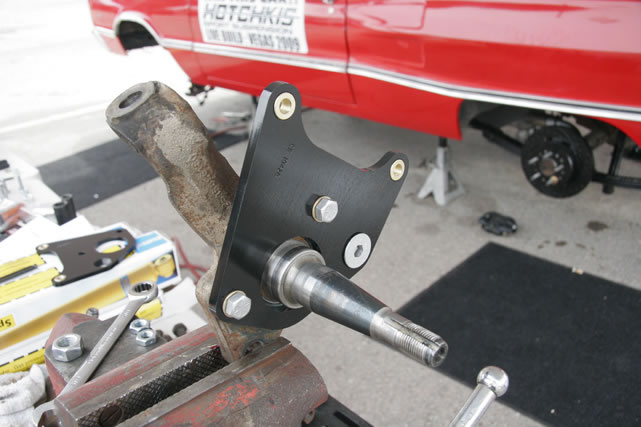 We started with a stock Coronet drum brake spindle, but Wilwood also makes a front disc brake system for cars that have been converted to the later A-body style disk brake spindle. The billet caliper bracket bolts onto the spindle with supplied hardware. |
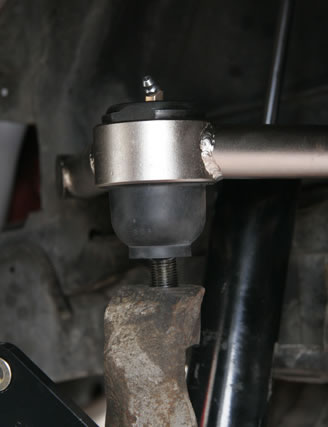 Next we bolt the A-arm to the top of the spindle and grease it unit with the zirc fitting. |
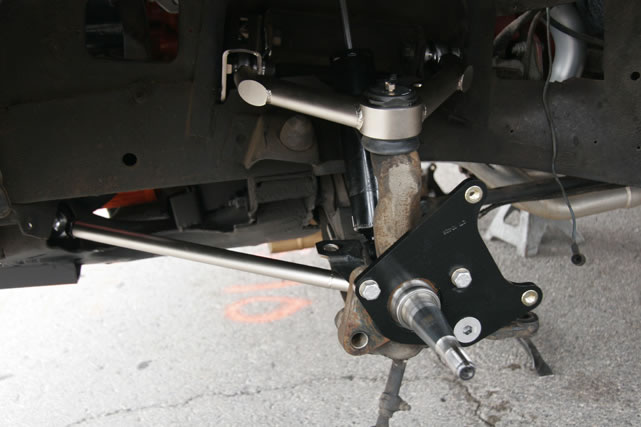 As you can see, the new front suspension is really coming together. |
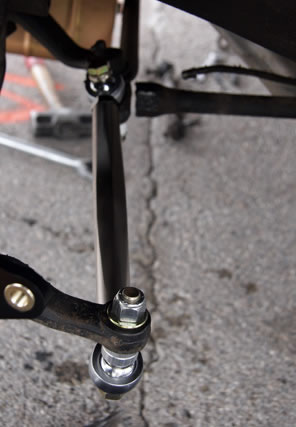 These Hotchkis Adjustable Steering Tie Rods work in conjunction with the new A-arm to eliminate bump steer. If you aren’t familiar with the term, bump steer is the change in tow-in and tow-out as the car moves up and down throughout the suspension travel. A stock B-Body has over one inch of bump steer. With the Hotchkis components installed that is reduced to 1/16”, about the same as a 2009 Challenger SRT8. |
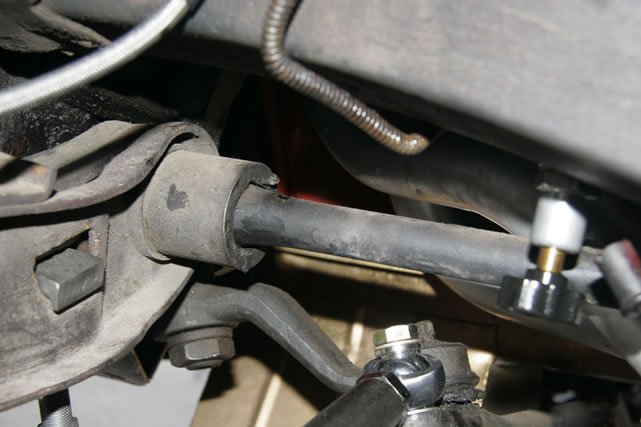 Finally the torsion bars are re-installed. In this application we used the stock torsion bars, but on a high-performance car that would see some track time, we recommend Mopar Performance circle-track style torsion bars. |
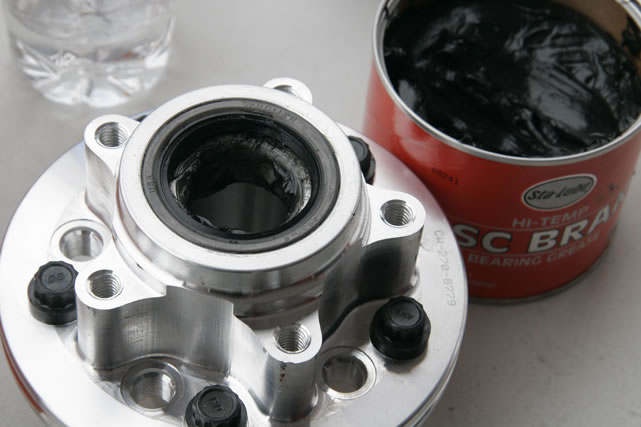 Most Wilwood front disc brake kits use a billet center hub that bolts to an outer disc rotor. We installed the studs, packed the bearings and pressed in the race to hold it together. |
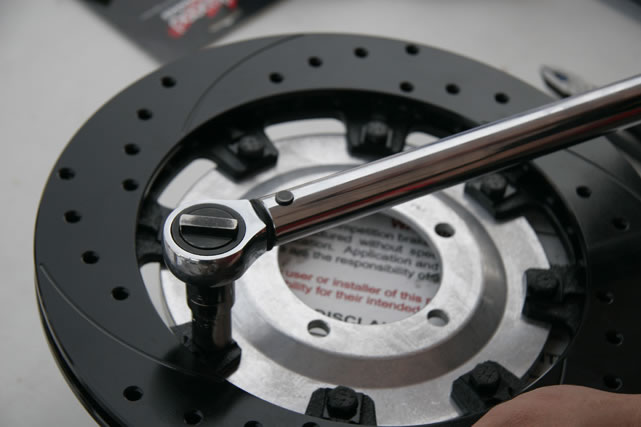 The outer rotor assembly is needs to be assembled with the provided Grade-8 bolts, then checked with a torque wrench or bolt stretch gauge. |
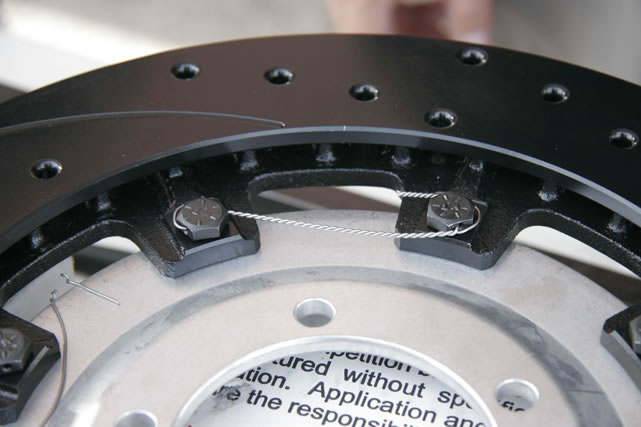 The bolts are then safety wired to ensure durability. Notice Aaron ran the safety wire so that it keeps the bolts loaded in a clockwise position, which is common practice on racecars and aircraft. |
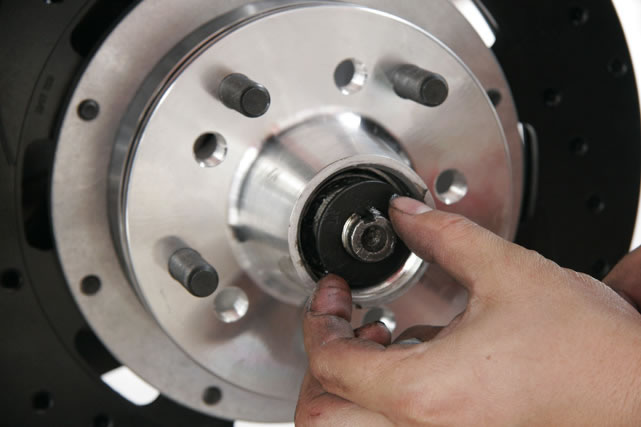 The assembled rotor was slipped onto the spindle, followed by a keyed washer and nut. |
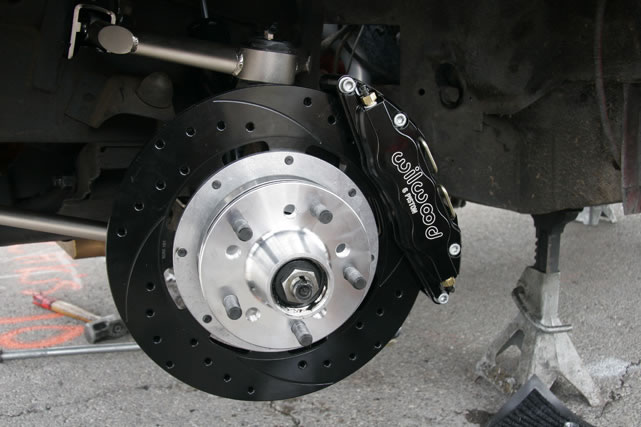 Finally Steve bolted on the killer looking forged six-piston Wilwood caliper. Between the new suspension hardware and the big vented brakes, the Coronet is really starting to look like a high-performance machine. |
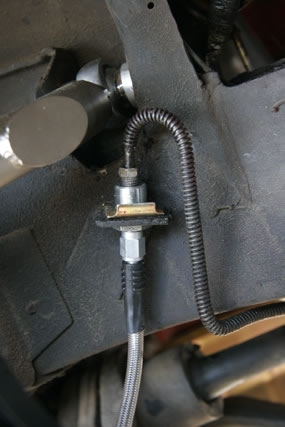 The factory brake line meets a junction block, where it is plugged into the new braided stainless line from Wilwood. Steve “bench bled” the master cylinder to remove most of the air from the system, then bled each caliper individually. |
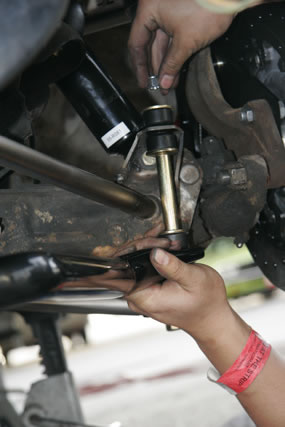 Hotchkis has been building tubular sport sway bars for over 15 years, and we’re incredibly proud of our new bars for the Mopar B-Body. First the end links attached to the lower A-arms. |
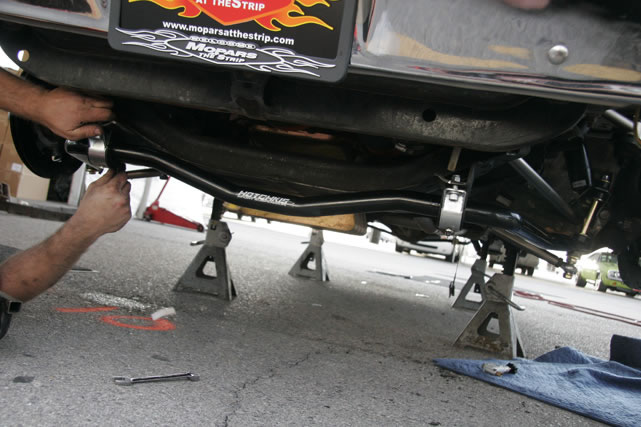 Then the bar is bolted to the sub frame with included urethane bushings and brackets. |
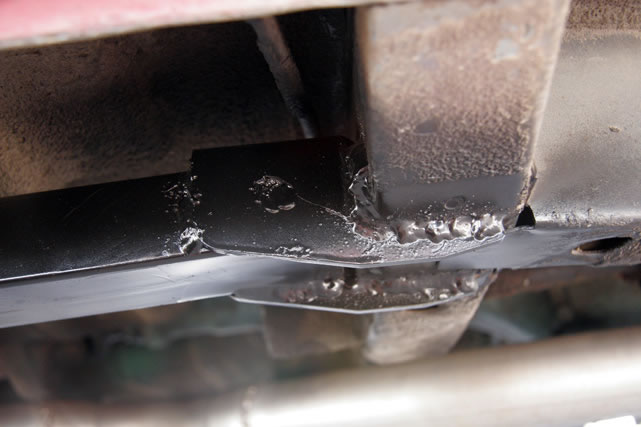 The last step in the chassis rebuild: high-strength subframe connectors. |
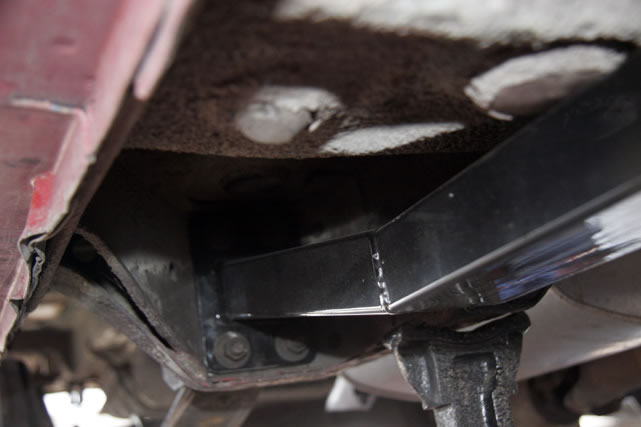 Even though you can theoretically bolt the rear of the bar to the rail, it works best to weld it as well for maximum torsional rigidity. |
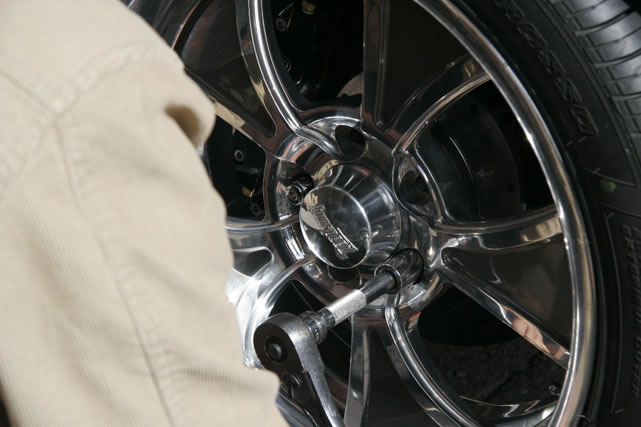 Brad Fanshaw and the crew at Bonspeed Wheels were kind enough to support the project with a beautiful set of RodR 18-inch billet wheels, complete with a polished lip and outer spoke and dark grey powdercoated inner spoke. Bonspeed truly makes some of the best billet wheels in the business. Before hauling the wheels to Vegas, we had them mounted with Pirelli P-Zero Rosso ZR rated rubber. |
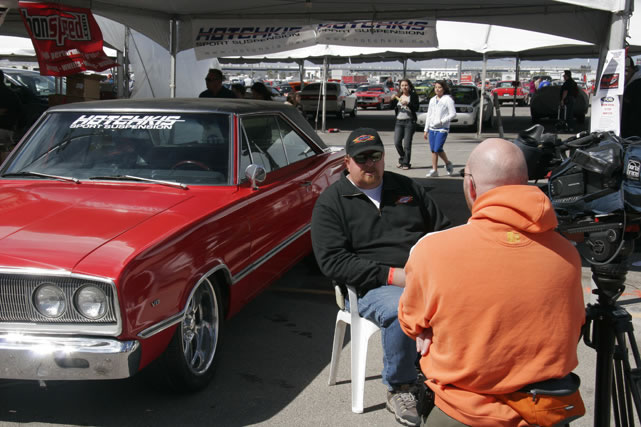 Moments after the car was lowered off the jackstands, a reporter from Las Vegas Channel 8 News came by to interview Mopars at the Strip founder Phil Painter and inquire about the exciting live build of the charity raffle car. |
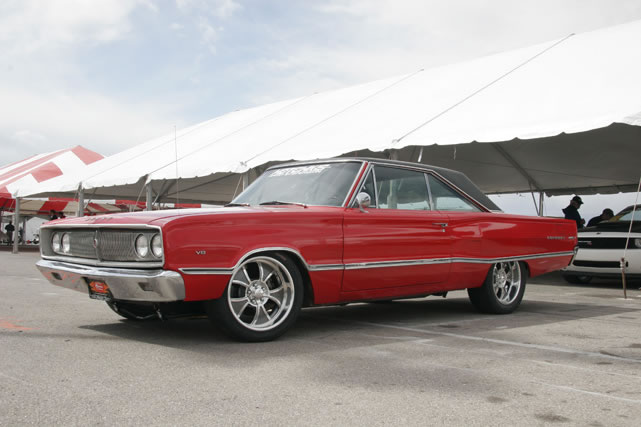 Talk about night-and-day difference. Without a paint job or any other major cosmetic modification, we completely transformed the Coronet from a dated looking classic into a timeless muscular G-machine loaded with attitude. |
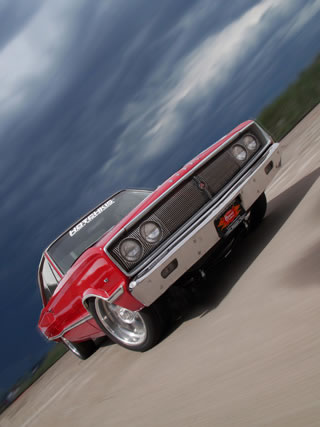 The finished product handles like a modern sports car, has a nice compliant ride, boasts incredible steering feel, nearly zero body roll and incredible style. Thanks again to all our co-sponsors: Pure Vision Design, Wilwood Brakes, Bonspeed Wheels and Pirelli Tires. Look for the car with even more mods at Mopars at the Strip 2010! |

